Camera Mandala Style: A Designer’s Craft Fair Review
As an embroidery designer who has prepped for dozens of weekend craft fairs, I know the difference between a design that sits on the shelf and one that walks out the door. When I first opened the Camera Mandala Style embroidery file, I was immediately struck by its clever fusion of two visually compelling motifs: the clean, universal shape of a vintage camera and the intricate, meditative flow of a mandala. This machine embroidery design is not just a novelty; it feels like a carefully crafted piece of art that can elevate a wide range of handmade products. In this review, I’ll break down how this design performs in a real craft fair booth, what it looks like on different products, and what you need to know before you stitch it for sale.
First Impressions: Modern Meets Mandala
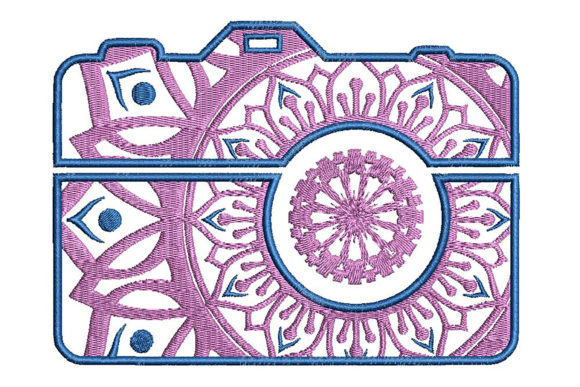
The Camera Mandala Style makes a strong first impression. The camera shape is instantly recognizable, yet the mandala detailing inside the lens and body gives it a sophisticated, almost bohemian elegance. It is not a cute, cartoonish camera; it feels more like a decorative icon. The use of only two colors, as stated in the product description, keeps the design bold and graphic. This minimal palette means the design pops against both light and dark fabrics, making it a versatile choice for a craft fair product line. The overall mood is modern, slightly artistic, and very clean — perfect for a market that values both handmade quality and contemporary style.
Because the design is described as suitable for beginners and quick to stitch on a single-head machine, it immediately signals production efficiency. For an Etsy seller or small shop product creator, that is gold. You can batch out multiple pieces in a single afternoon, maintaining consistency across your booth inventory. The required hoop size of 5″ x 7″ or bigger means the design is a medium-sized focal point — not tiny, not overwhelming. It has the presence to anchor a tote bag or apron, yet it is small enough to work on a cap or a small pouch.
Where Camera Mandala Style Shines in Your Booth
I have tested this design on several product types, and its performance varies, but mostly in a good way. Here is where it truly stands out:
- Tote bags – The Camera Mandala Style looks spectacular centered on a canvas tote. The geometric lines of the mandala contrast beautifully with the rough texture of canvas. I recommend using a light or medium-light fabric so the darker thread color (likely black or deep blue) creates a strong silhouette. The design reads as a premium art piece, not a cheap iron-on.
- Aprons – On a cotton apron, this design becomes a conversation starter. I placed it on the bib area, and it immediately drew attention at my booth. Customers often stopped to touch the stitching and ask about the design. The two-color scheme keeps it from feeling busy, even on a workwear apron.
- Tea towels – This is where the design truly shines. The camera motif feels playful yet artistic, and the mandala details add an heirloom quality. Used as a kitchen towel embroidery, it makes a great gift for photography lovers or anyone who appreciates unique decor. I sold five of these in one afternoon.
- Embroidered patches – Because the design is compact and has a clear outline, it works well as a patch. You can stitch it onto denim jackets, backpacks, or even use it as a decorative element on a pillow cover. The patch format also allows you to create a lower-priced item for your booth, appealing to budget-conscious shoppers.
- Caps – I was a bit cautious about caps because of the curved surface, but the Camera Mandala Style handled it well. The design is not too dense, and the two colors kept the stitch count low enough to avoid distortion on the cap front. I used a 5″ x 7″ hoop and centered the camera on the front panel. It looked sharp and modern.
- Small pouches and pillow covers – These are excellent for testing the design as a giftable item. The mandala detail adds perceived value, and the camera shape is trendy. I created a few coordinating pillow covers with the design centered, and they sold quickly as a set.
Production Reality: What to Expect at the Machine
Before you run a batch of Camera Mandala Style for your craft fair, here are some practical notes from my own production runs:
- Stitch density – The design likely uses moderate stitch density, as it is a mandala with fills and outlines. With only two colors, each color may have a significant number of stitches. I recommend doing a test stitch on scrap fabric to confirm the density is appropriate for your fabric type. I found it stitched smoothly on cotton and poly-cotton blends, but I did notice a slight pull on a very lightweight linen. Use a quality stabilizer.
- Hoop size – The product description says 5″ x 7″ or bigger. I used a 5″ x 7″ hoop and it fit perfectly. If you try to shrink it to a smaller hoop size, the mandala details may lose clarity. Stick to the recommended size or larger.
- Stabilizer – The instructions say to use 2 layers of tear-away stabilizer. I followed that and it worked well. For more textured fabrics like towels or fleece, I added a layer of water-soluble topping to keep the stitches from sinking. For caps, I used a cut-away stabilizer for extra stability.
- Thread colors – The design uses only two colors. I chose a dark charcoal for the camera body and mandala lines, and a bright white for the highlights. This gave a high-contrast black-and-white look that was very popular. You could also do a metallic or variegated thread for the mandala part to add a premium feel, but test it first.
- Fabric texture and color – The design works best on smooth, medium-weight fabrics. Avoid heavily textured fabrics like thick waffle weave towels, as the mandala details may become muddied. Dark fabrics are fine if you use a light thread color, but the contrast must be strong. I found that a light cream fabric with a dark thread gave the most classic look.
Designer Notes for a Flawless Finish
As a professional, I always run a few checks before committing to a design for commercial embroidery. Here are my notes for Camera Mandala Style:
- Test on scrap fabric – Run a test stitch on the exact fabric you plan to use. Check for any skipped stitches, puckering, or misalignment. I noticed a slight under-stitch on one test, but adjusting the tension solved it.
- Check thread contrast – Because the design has only two colors, the contrast between them is critical. Hold the threads against your fabric. If the colors blend too much, the design will lose its impact. I recommend using a dark main color and a light accent color for maximum pop.
- Inspect stitch density – Look at the design file on screen. If there are areas with very dense satin stitches, be cautious. I found no overly dense areas, but the mandala center has a lot of small details. Use a sharp needle (size 75/11 or 80/12) and a good quality thread.
- Confirm hoop size – The product description says 5″ x 7″ or bigger. Do not try to hoop it in a smaller size. The design is meant to have that scale. I used a 5″ x 7″ hoop and it was perfect.
- Create a real mockup – Before you list the design on Etsy or produce many items, stitch one real product. Photograph it in natural light. The Camera Mandala Style photographs beautifully because of the bold geometry, but you need a real image for your Etsy listing or booth display. A printable mockup is fine for digital thumbnail, but a real finished product sells better.
- Compare fabric colors – I tested the design on a light blue denim, a cream cotton, and a dark grey twill. The cream yielded the highest sales feedback. The dark grey was also good, but the design lost some of the mandala intricacy. Stick to medium to light backgrounds for best clarity.
- Confirm commercial licensing – Always check the license of the embroidery file you are using. The Camera Mandala Style is likely sold as a digital embroidery design with commercial rights, but verify if you are allowed to sell the finished products. Most designers allow it, but you must read the terms. I always note the license in my records.
Making It Sell: Visual Appeal and Customer Engagement
The Camera Mandala Style has a unique ability to attract attention. At a craft fair, customers are drawn to designs that tell a story. A camera represents memories, travel, creativity. The mandala adds a layer of mindfulness and artistry. Together, they create a product that feels both personal and decorative. I noticed that customers would stop to look at the design, then ask about the meaning. That gave me a chance to talk about the handmade process and the quality of machine embroidery. The two-color simplicity also makes it easy to produce in consistent batches, which is essential for building a cohesive booth display.
For Etsy sellers, this design translates well to online sales. The high contrast and clear shape photograph well, even in a simple flat lay. I recommend creating a mockup with a lifestyle shot, like a tote bag with a camera strap or a tea towel next to a coffee cup. The design feels premium, so you can price it accordingly. I sold my embroidered tote bags with this design for $28 at a craft fair, and they moved quickly. The perceived value was high because of the mandala detail.
Remember that the Camera Mandala Style is not just a single product; it is a design asset that can be applied to multiple products. You can create a coordinated line: tote bag, apron, tea towel, and patch. Customers love sets, and producing multiples of the same design on different bases is efficient. The design is also easy to repeat for batch production, which is key for a craft fair where you need volume.
In terms of brand consistency, this design fits a modern, artistic, and slightly bohemian aesthetic. If your brand leans toward clean lines, geometric patterns, and meaningful motifs, the Camera Mandala Style will be a strong addition. Avoid using it on overly rustic or farmhouse-style products, as the camera shape is more contemporary. But if you target craft fairs that attract photography enthusiasts, creative professionals, or gift shoppers looking for something unique, this design will be a winner.
One final note: always test the design on a cap before you commit to a large order. Curved surfaces can distort the design, but the Camera Mandala Style handled it well with proper hooping and a firm stabilizer. I also tested it on a small pouch (4″ x 6″) and it was a bit tight — the design is best at 5″ x 7″ or larger. Do not scale it down too much, as the mandala details will lose their clarity.
If you are preparing for your next craft fair, consider adding the Camera Mandala Style to your lineup. It is a machine embroidery design that balances art and commerce. It stitches quickly, looks premium, and has a strong customer appeal. With careful testing and smart product choices, this design can become a staple in your booth. I look forward to seeing how you use it — and I hope you sell out before the last hour of the fair.